


Excel by Microsoft is a highly efficient data management and analysis tool that comes with a variety of features to simplify and automate tasks. Flash Fill is one such feature that was introduced in Excel 2013 and is incredibly useful but often overlooked.
It’s designed to recognize and replicate patterns in your data, enabling you to reformat, rearrange, and manipulate your spreadsheet content in a fraction of the time it would take to do these tasks manually. If you’ve ever found yourself copying, pasting, and tweaking cell content to get your data to look just right, Flash Fill could be the timesaving solution you’ve been looking for. In this article, we’re going to delve into the capabilities of Flash Fill and showcase five essential tricks that will transform how you use Excel. Whether you’re a beginner or an experienced Excel user, get ready to explore how this feature can take your spreadsheet skills to new heights.
Table of Contents
Understanding Flash Fill
At its core, Flash Fill is an intelligent tool that identifies patterns in your data and applies them automatically as you work. Introduced in Excel 2013, it functions almost like a blend of Excel’s AutoFill and the power of a text-based function, but without the need to write any actual formulas. This feature’s power lies in its simplicity and efficiency. It’s designed to ease the process of data manipulation, whether you’re extracting or combining data, reformatting content, or cleaning up your datasets.
Flash Fill observes and learns from the manual changes you make to your spreadsheet data. It then makes educated predictions and offers to autofill the rest of your data in a similar manner. This not only minimizes the risk of manual errors but also greatly reduces the time spent on monotonous data entry or reformatting tasks. With Flash Fill, complex tasks become achievable with just a few keystrokes, saving precious time and effort. As we dive deeper into the different ways to leverage this feature, you’ll discover how this tool can truly revolutionize the way you handle and manipulate data in Excel.
Getting Started
Before we can master the tricks of Flash Fill, it’s important to understand how to activate and use this feature. Essentially, it is a background function that is usually active by default in Excel. As you type data into your cells, Excel’s Flash Fill function monitors your input for patterns and replicates these patterns where it finds a match. For instance, if you begin typing a new column of data based on an existing one, Excel will automatically suggest the remaining entries based on the pattern you started. To accept this auto-filled suggestion, simply press Enter.
But what if Flash Fill’s auto-suggestion doesn’t kick in, or you want to trigger the function at a specific point? Don’t worry; you can also activate it manually. There are two simple ways to do this. The first is by using the shortcut key CTRL + E. The second is by going to the ‘Data’ tab in Excel’s Ribbon interface, then clicking on ‘Flash Fill’ in the ‘Data Tools’ group.
Keep in mind that for Flash Fill to work, the column you’re working on must be adjacent to the column that contains the original data. If it isn’t, you’ll need to move it, as the feature pulls data based on neighboring columns. Now that we’ve covered the basics of activating Flash Fill, let’s delve into the practical applications and tricks that will make this tool an invaluable part of your Excel toolkit.

Trick #1: Extracting Information
One of the most powerful uses of Flash Fill is extracting specific pieces of data from a complex string of information. This is particularly useful when you have a column of data where multiple pieces of information are combined in each cell, and you want to separate out one specific part.
Consider a column filled with full names in the format “Last Name, First Name” and you want to create a new column containing only the first names. Instead of manually copying each first name or using complex text formulas, you can use Flash Fill to accomplish this in just a few steps.
First, you’ll need to type the first name from the first cell into the new column. Next, start typing the first name from the second cell in the same column. As you’re typing, Excel’s Flash Fill should recognize the pattern and auto-complete the rest of the column for you. If it doesn’t, simply press CTRL + E or manually select Flash Fill from the ‘Data’ tab to trigger it.
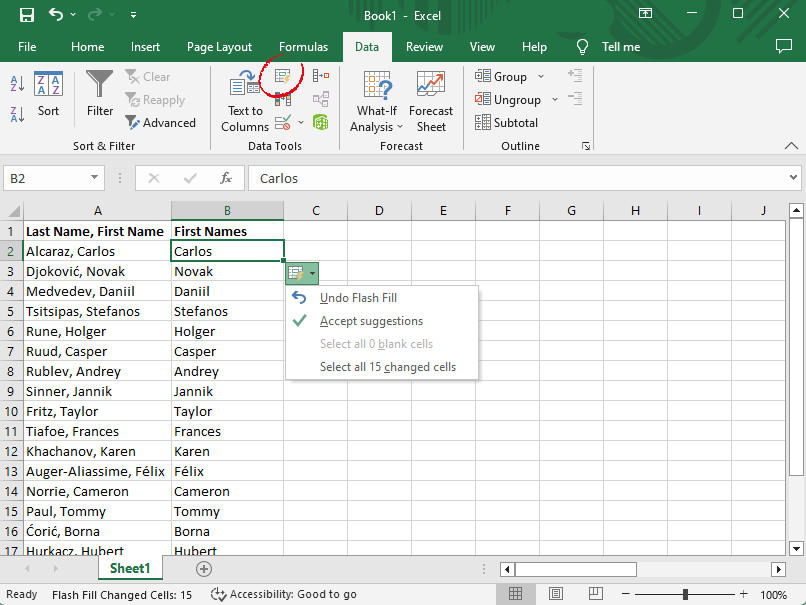
Remember to check the auto-filled data for any discrepancies, as Flash Fill relies on patterns and may occasionally misinterpret data, especially if there are inconsistencies in the original dataset. This handy trick can save you an immense amount of time, especially when working with large datasets. You’ll be amazed at how quickly you can extract the information you need using Flash Fill.
Trick #2: Formatting Data
Flash Fill can also be a lifesaver when it comes to reformatting data. Inconsistent or inconvenient data formats can be a headache in Excel, especially when dealing with things like dates, telephone numbers, or text strings. Instead of going through the tedious process of manually adjusting each cell, Flash Fill can help you change the format of your data quickly and efficiently.
For instance, let’s say you have a column of dates formatted as “YYYY-MM-DD”, but you need them in the format “DD/MM/YYYY”. Instead of writing a complex formula to rearrange each element, you can simply start typing the first date in the desired format in a new, adjacent column. After typing one or two cells this way, you can activate Flash Fill. Excel will recognize the pattern and autofill the remaining cells with dates in the new format.
Similarly, if you have a list of phone numbers with area codes and want to change the format (e.g., from “(123) 456-7890” to “123-456-7890”), Flash Fill can make this task a breeze.
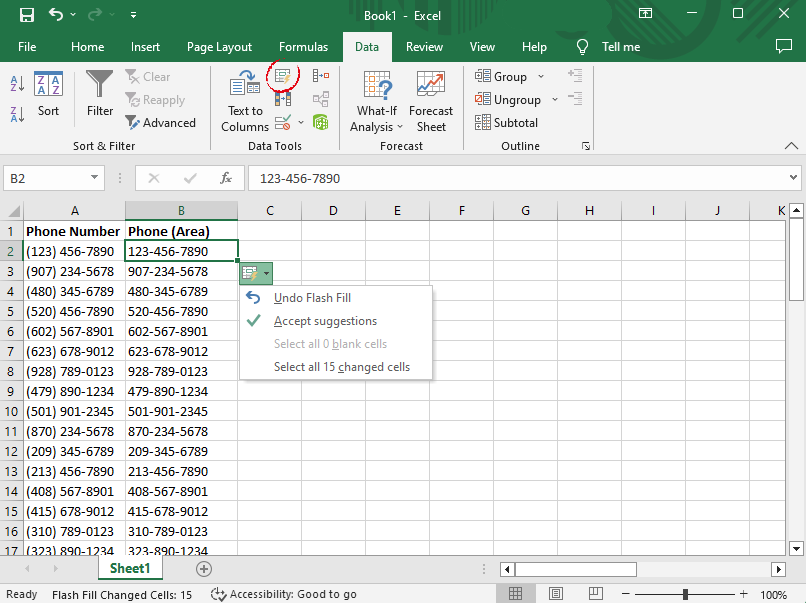
As always, after using Flash Fill, it’s essential to review the auto-filled data to ensure everything is formatted as expected. This trick can prove invaluable when handling data requiring standardization, making your data analysis faster and more efficient.
Trick #3: Combining Information
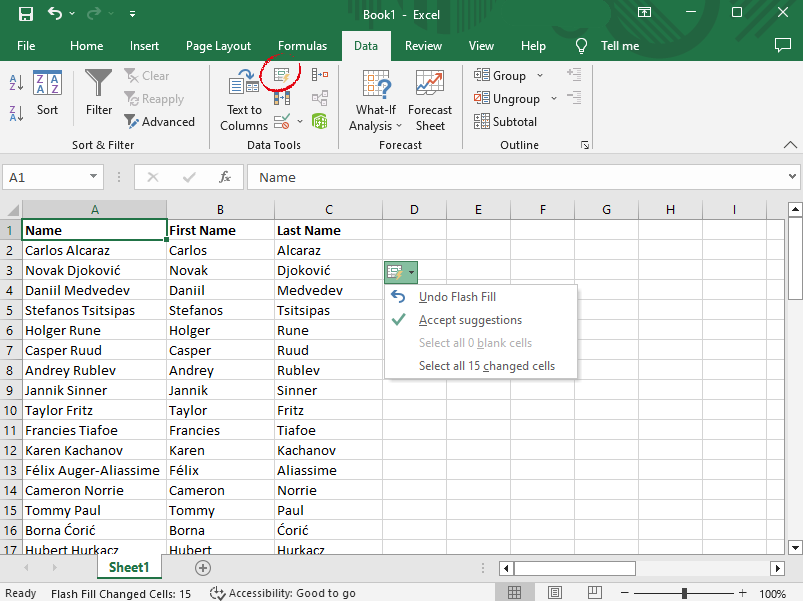
Just as Flash Fill can pull apart data, it can also be used to combine information from different columns. This can be extremely useful when you need to merge data from separate fields into a single string, such as combining first and last names or constructing full addresses from separate city, state, and zip code columns.
Let’s take a simple example where you have a column for first names and a column for last names, and you want to combine these into a single column. First, you’ll create a new column adjacent to the existing ones. Then, type the full name (first and last name) in the first cell of the new column. As soon as you start typing the full name for the second row, Excel’s Flash Fill should recognize your pattern and suggest to autofill the remaining cells. If it doesn’t, you can press CTRL + E or use the ‘Data’ tab to activate it manually.

With Flash Fill, you can easily combine data from multiple columns into a unified format, saving you from the tedious task of copying and pasting data. However, just like with the previous tricks, it’s crucial to review the auto-filled data for accuracy, as Flash Fill’s predictions depend on consistent patterns in the original data.
Trick #4: Splitting Data
Flash Fill is also an expert at doing the exact opposite of combining data – it can split information into multiple columns with ease. This can be extremely handy when you have a single column that includes several pieces of information, and you want each piece of information in its own column. For instance, you might have full names in a single column and want to separate them into first and last name columns, or you might have addresses that you want to break down into separate street, city, state, and zip code columns.
Take an example where you have a column with phone numbers in the format “123-456-7890” and you want to separate the area code from the rest of the number. Start by creating two new columns adjacent to the original one. In the first new column, type the area code from the first cell. In the second new column, type the seven-digit phone number without the area code. Once you’ve done this for the first cell and start on the second, Flash Fill should recognize the pattern and offer to complete the rest of the columns for you.
This trick makes it easy to divide combined data into separate, easily analyzable units. And as always, it’s important to review the results for accuracy, as Flash Fill is dependent on consistency in the original data. With this trick, Flash Fill again proves its worth as a powerful tool in your Excel toolkit.
Trick #5: Data Cleaning
Flash Fill’s functionality extends even further into an essential aspect of data management: data cleaning. As any experienced Excel user will tell you, messy data can cause all sorts of headaches. Inconsistencies in capitalization, extra spaces, or unwanted characters can make data analysis a cumbersome process. Fortunately, Flash Fill can streamline these data-cleaning tasks.
Suppose you have a list of names where some are all lowercase, some are all uppercase, and some are a mix. If you want to standardize these names to have only the first letter capitalized, you can easily achieve this with Flash Fill. Begin by typing the first name in the desired format in a new, adjacent column. After typing the first or second properly formatted name, Excel’s Flash Fill should suggest auto-filling the remaining cells based on your pattern. As before, if the autofill suggestion doesn’t appear, you can manually trigger Flash Fill using CTRL + E or from the ‘Data’ tab.

Similarly, if you have data with unwanted spaces before or after the text, you can type the first few entries without these spaces and let Flash Fill do the rest.
However, note that while Flash Fill can be very helpful in cleaning data, it’s not as comprehensive as some of Excel’s dedicated data cleaning functions, such as TRIM, CLEAN, or PROPER. It’s also crucial to thoroughly check the auto-filled data for accuracy, as Flash Fill works based on patterns and may not always interpret inconsistent data as expected. Nevertheless, for straightforward data cleaning tasks, Flash Fill can be a quick and easy solution.
Best Practices and Tips
Using Flash Fill can significantly streamline your workflow in Excel, but to truly get the most out of this feature, it’s important to keep a few best practices and tips in mind:
- Consistent patterns: This feature works best with consistent patterns. If your data is not consistently structured, Flash Fill may have difficulty identifying the correct pattern, leading to errors in the auto-filled data.
- Check the results: Always review the results after using Flash Fill. While it’s a powerful tool, it can occasionally misinterpret patterns, especially with complex or inconsistent data. Manual checking helps ensure accuracy.
- Data adjacency: Remember that it works on adjacent columns. If the data you want to use isn’t in a neighboring column, you may need to rearrange your worksheet to utilize Flash Fill effectively.
- Case sensitivity: Flash Fill is case-sensitive. It recognizes differences in capitalization and will replicate the exact case in its autofill suggestions.
- CTRL + E Shortcut: Make use of the CTRL + E shortcut to manually trigger it when it doesn’t automatically suggest an autofill. It’s a quick way to implement Flash Fill without having to navigate through the Ribbon interface.
- Combining with other Excel features: While this feature is powerful, don’t forget that Excel has many other features and functions that can be used in combination with Flash Fill. For instance, the TRIM, CLEAN, and PROPER functions can further aid in data cleaning tasks where it may fall short.
By adhering to these best practices and tips, you’ll be able to maximize the benefits of Flash Fill, enhancing your efficiency and productivity in Excel. With a bit of practice, you’ll soon find Flash Fill becoming an indispensable tool in your Excel repertoire.
Conclusion
In the fast-paced world of data management and analysis, efficiency is key. Microsoft Excel’s Flash Fill is a feature that embodies this principle, enabling users to automate and simplify a wide range of tasks such as data extraction, combination, splitting, reformatting, and even basic data cleaning. Through understanding and effectively utilizing this tool, you can significantly cut down on the time spent on monotonous data manipulation tasks, freeing you to focus on the more complex and meaningful aspects of your work.
Although it may seem daunting at first, with the tips and tricks we’ve covered in this article, even Excel beginners can start to unlock the powerful potential of Flash Fill. Remember, like any tool, this feature is most effective when used correctly, so always check your auto-filled data for accuracy and ensure your original data is structured consistently for the best results.
Whether you’re an experienced Excel user looking to optimize your workflow or a beginner exploring the capabilities of this robust software, Flash Fill is an excellent feature to add to your Excel skill set. With practice and understanding, you’ll soon discover how this time-saving tool can revolutionize your Excel experience.
Frequently Asked Questions
What is Excel’s Flash Fill feature?
Flash Fill is a feature in Excel that automatically fills in values in a column based on patterns it identifies from the data that you input. It can help save time by reducing the amount of manual data entry you need to do.
Why isn’t Flash Fill working on my Excel sheet?
There could be several reasons why this feature isn’t working. It might be because the patterns in your data aren’t clear enough or because it has been disabled in your Excel settings.
How can I enable or disable Flash Fill?
To enable or disable this feature, go to File > Options > Advanced, then scroll down to the “Editing options” section. Check or uncheck the box for “Automatically Flash Fill”.
Can Flash Fill recognize complex patterns?
It is a very powerful feature and can recognize a variety of patterns, but it has its limits. It’s best used for relatively simple and consistent patterns. For more complex patterns, you may need to use formulas or other Excel functions.
Can I use Flash Fill on multiple columns at once?
This feature typically works on one column at a time based on patterns identified in adjacent columns. For filling multiple columns, you would need to apply it individually to each column.
Additional Resources
For further exploration of Flash Fill and to dive deeper into its capabilities, consider the following resources:
Microsoft Support: Microsoft’s official support page offers a wealth of information and practical examples on how to use Flash Fill effectively. You can learn more about the feature, explore additional applications, and find answers to frequently asked questions. Visit the Microsoft Support Page on Flash Fill for detailed guidance.
Microsoft Excel Community Forums: Here, you can interact with other Excel users, ask questions, share experiences, and learn new ways of using Flash Fill and other Excel features. The community is full of expert users and Microsoft employees who are eager to help and share their knowledge. Check out the Microsoft Excel Community for insightful discussions.
If you are interested in another time saver Excel Feature, you can check this article about Linked Data Type.
Remember, continuous learning and practical application are the best ways to become proficient in any tool. The more you practice using Flash Fill, the more you’ll appreciate its efficiency and the impact it can have on your Excel workflow. Happy learning!